How To Make Your Own DTF Transfers: Easy and Effective Guide 🖨️🎨
Dreaming of making your own custom prints at home? 🎽
If you're interested in designing t-shirts, hoodies, or tote bags, learning how to make your own DTF transfers is a fantastic way to start.
It’s beginner-friendly, fun, and offers a lot of creative freedom.
With the right tools and basic knowledge, you can bring your ideas to life.
Let’s break it down step by step and explore everything you need to know.
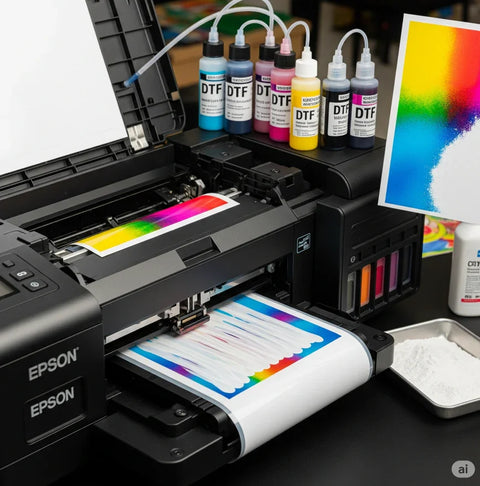
🎯 What Is DTF Transfer?
DTF stands for Direct-to-Film.
This process lets you print designs on a clear film and then transfer them to fabric using heat.
It’s different from sublimation or vinyl.
The main advantage is that DTF works on cotton, polyester, and blended fabrics.
This makes it very flexible and cost-effective.
The prints produced are colorful, sharp, and durable.
With good care, they can withstand many washes without fading or cracking.
🧰 What You’ll Need to Get Started
Before printing, gather these essentials:
-
A converted inkjet printer for DTF
-
DTF ink set (CMYK + white)
-
DTF film (PET film sheets)
-
Hot melt adhesive powder
-
A heat press or strong household iron
-
Design software (like Photoshop, Illustrator, or Canva)
-
A clean, flat surface to work on
Having the right tools ensures quality and consistency.
Even small details matter when printing, so invest in good materials.
✏️ Step 1: Create and Prepare Your Design
Open your design software and begin creating your image or logo.
Make sure it’s sized correctly for your garment.
Helpful tips for setup:
-
Use CMYK color mode
-
Set resolution to 300 DPI
-
Save the file as PNG with transparent background
-
Add a white background layer if needed
These steps help ensure that your print is sharp and color-accurate.
A clean, high-resolution image will always give better transfer results.
🖨️ Step 2: Print on DTF Film
Now it's time to print.
Insert the DTF film into your printer with the correct side facing up.
This is usually the matte or coated side.
Print your design in mirror mode.
First, the color layers are printed.
Then, the white ink is applied on top to back up the colors.
This white layer helps the design pop on any fabric.
RIP software may help optimize ink output and color accuracy.
🧂 Step 3: Add the DTF Powder
Once your film is printed, don’t wait too long.
While the ink is still wet, pour hot melt powder over the design.
Make sure the powder sticks to all inked areas.
Gently shake off excess powder.
You can also tilt the film in different directions for even coverage.
This powder is what makes the ink bind to the fabric during heat pressing.
Without it, your design won’t stick properly.
🔥 Step 4: Cure the Powder
Next, the powder must be cured or melted.
You can use a heat press or a DTF curing oven.
If using a heat press:
-
Set temperature to 160°C (320°F)
-
Hover the top plate over the film (no pressure)
-
Cure for 2–3 minutes
The powder will melt slightly and form a smooth, glossy surface.
This shows it's ready for transfer.
👕 Step 5: Transfer the Print to Fabric
Now the fun part begins: pressing your design onto the garment.
Here’s what to do: How To Make Your Own DTF Transfers
-
Place your shirt or fabric flat on the heat press
-
Position the film, printed side down, on the fabric
-
Press at 160°C for 15–20 seconds
-
Let it cool completely (cold peel)
-
Gently peel off the film
For extra durability, press the design again with a Teflon sheet for 5 seconds.
This second press improves the bond and finish.
🧼 Step 6: Wash and Care Tips
To make your DTF prints last: How To Make Your Own DTF Transfers
-
Always wash inside out
-
Use cold water
-
Avoid bleach and harsh chemicals
-
Do not iron directly on the print
-
Air dry or tumble dry low
With proper care, your prints stay vivid even after 40–50 washes.
These small habits protect both the fabric and the design.
✅ Why Learn How to Make Your Own DTF Transfers?
Here are a few reasons why learning this skill is worth it: How To Make Your Own DTF Transfers
-
Print custom designs anytime
-
Save money on outsourcing
-
Start a home-based printing business
-
Quickly test new artwork
-
Control every step of the process
DTF is ideal for small batch runs, prototypes, or personal fashion.
It's affordable and gives professional results.
🧠 Final Tips for Success :How To Make Your Own DTF Transfers
-
Always use clean, dust-free DTF film
-
Keep your printer’s nozzles in good shape
-
Test print before large production
-
Work in a ventilated space
-
Store printed film flat to avoid smudging
Attention to these small details will lead to better output every time.
🎉 Ready to Print?
Now that you know How To Make Your Own DTF Transfersyou're ready to begin.
With the right materials and a bit of practice, you can create amazing, customized garments at home.
So power on your printer, choose a fun design, and start printing today! 👕✨